Something as simple as sending a push notification should be one of the easiest parts of building your app. Why then is it so complicated? When I was building my React Native app, I was baffled at how difficult it was to implement push notifications myself after I ejected from Expo.
If you haven’t figured it out already, Apple’s Documentation is trash. If you find a useful piece of documentation from Apple’s website that genuinely helps you on your mission to implement push notifications, I think you should double-check that you’re not dreaming and send me a link because I’d love to see it.
Anyways, it took me a surprisingly long time to figure out what is really a pretty simple process if you know what to do.
The basic concept is:
- Generate a certificate for your server to authenticate with Apple’s Push Notification Service.
- Convert that certificate into something that can actually be used by your web service.
- Request device Push Notification tokens
- Send a notification
How do you generate an Apple Push Notification Service Certificate?
The first step in sending push notifications is getting a certificate. You’ll want to generate two certificates: one to use when you’re developing and one to use in prod. Apple is pretty clear about which kind you’ll be generating during the process.
Follow the following steps to generate your certificates.
Step 1. Log into your apple developer account
Go to Go to developer.apple.com and login.
Step 2: Edit Certificates for your App
Once you’re logged in to your Apple Developer account, click on Certificates, Identifiers & Profiles.

Step 3: Edit Your App Identifier
Click on the Identifiers item in the lefthand menu once you’re on the Certificates, Identifiers & Profiles page.
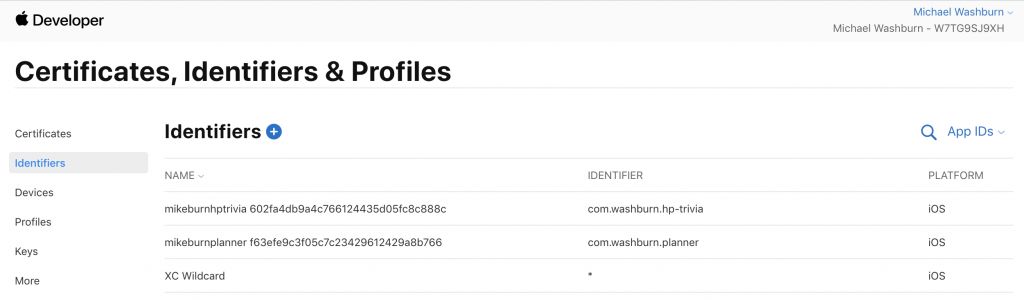
Find the app you’re working on in the table that shows up and click on it to edit it.
Step 4: Enable and Edit Push Notifications
If you haven’t enabled push notifications already, do that now. Just check the box on the left side of the Push Notifications row, then click save in the top right corner.
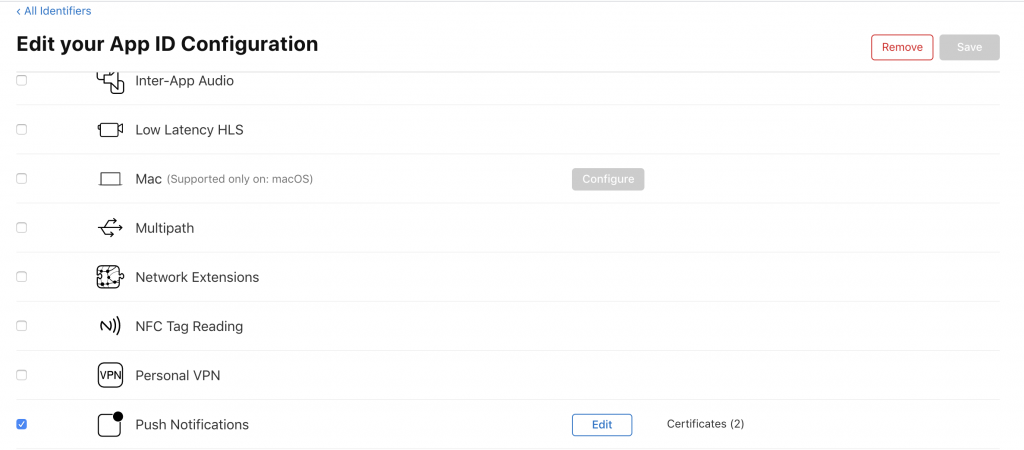
Once your Push Notifications have been enabled, click the Edit or Configure button which will be in the same row to the right.
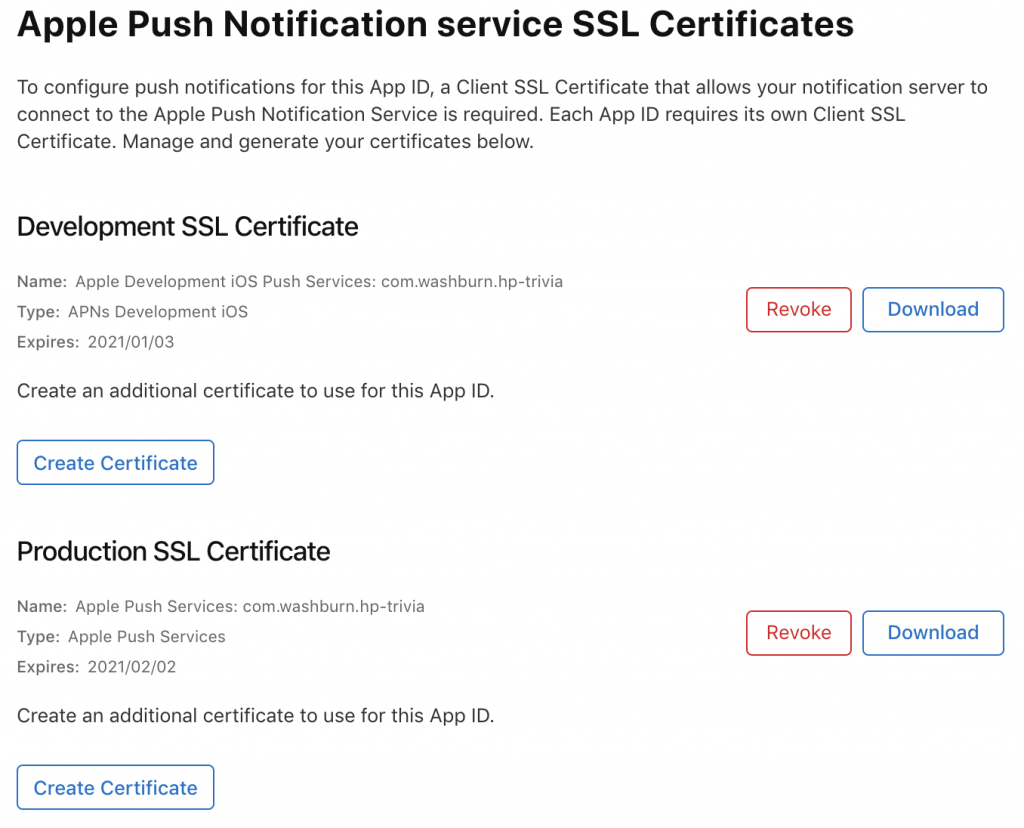
Click “Create Certificate” and you’ll be ready to upload your certificate signing request and download your certificate. Keep the page that it redirects you to open and we’ll revisit this in step 6.
Step 5: Generate a Certificate Signing Request
Before you get your certificate, you’ll need to generate and upload a certificate signing request.
To do this, follow these steps:
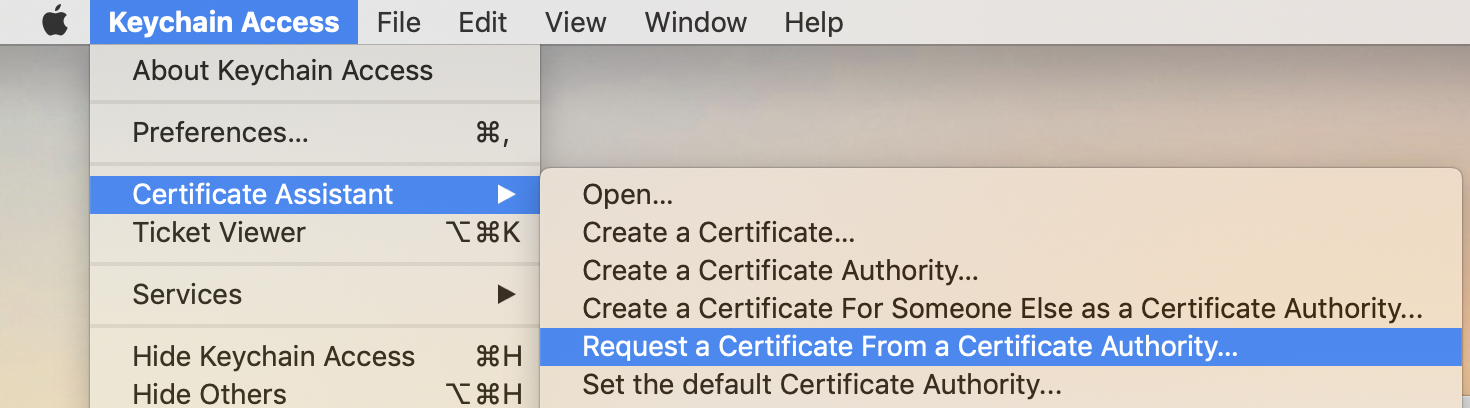
- Open up the Keychain Access app on your Mac.
- In the menu, go to Keychain Access > Certificate Assistant > Request a Certificate from a Certificate Authority
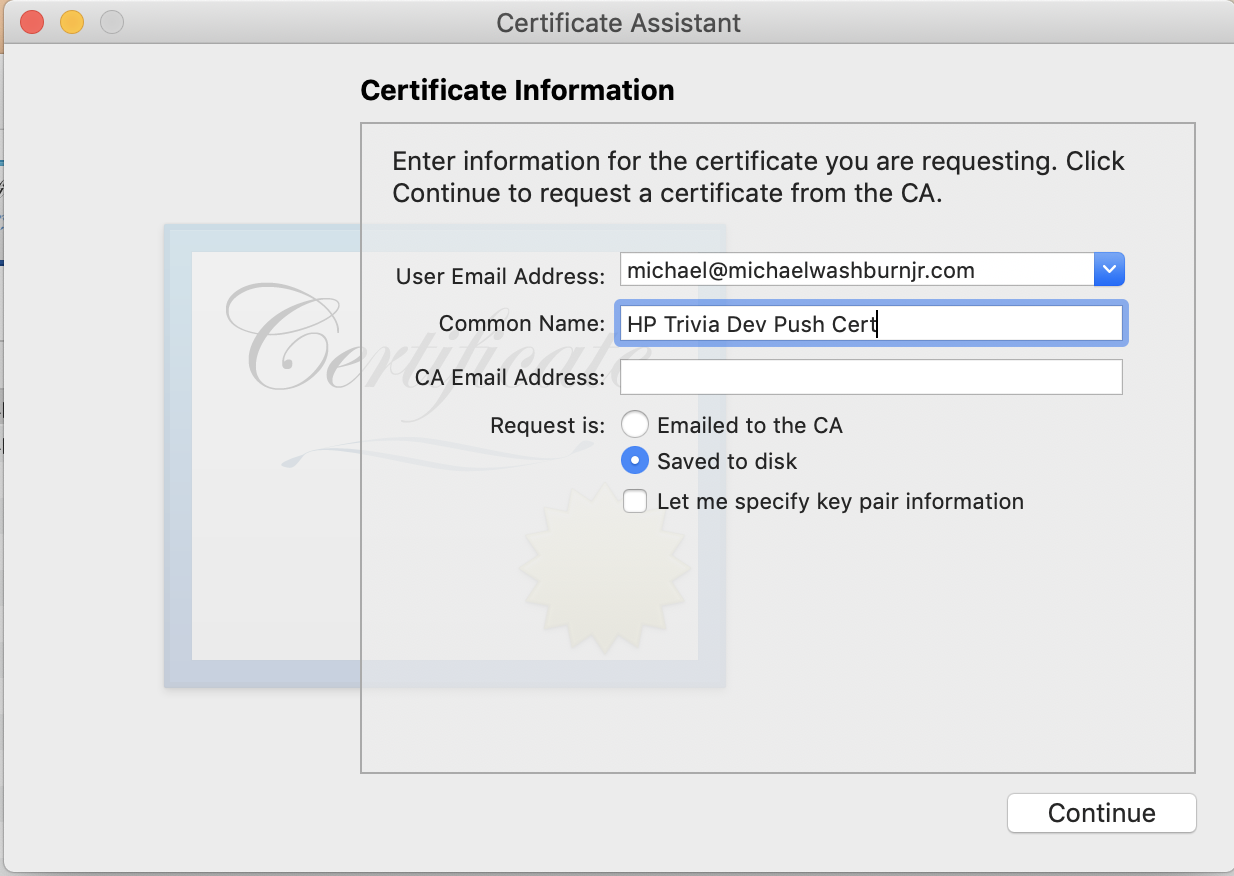
- Fill out the form with your email address, a useful description of the certificate your requesting, and select the option to save to disk.
Step 6: Upload your Certificate Signing Request (CSR) and Download your Certificate
Go back to the page from the end of Step 4. It should look like this:

Upload the CSR you just created, then, download your new push notification certificate. This should be called something like aps.cer or aps_development.cer.
Step 7: Convert your Certificate from a .cer to a .pem
Most frameworks you’ll use to actually send notifications, such as PyAPNS2, will actually require you to provide them with a .pem file for your certificate. We can transform our newly generated .cer file into a .p12 file and then into a .pem file using a relatively simple process.
- First, double-click your certificate file that you downloaded. This will add it to the Keychain Access app.
- Open Keychain Access and go to the “My Certificates” category
- Find your certificate in the list.
- Right click it and select the Export option
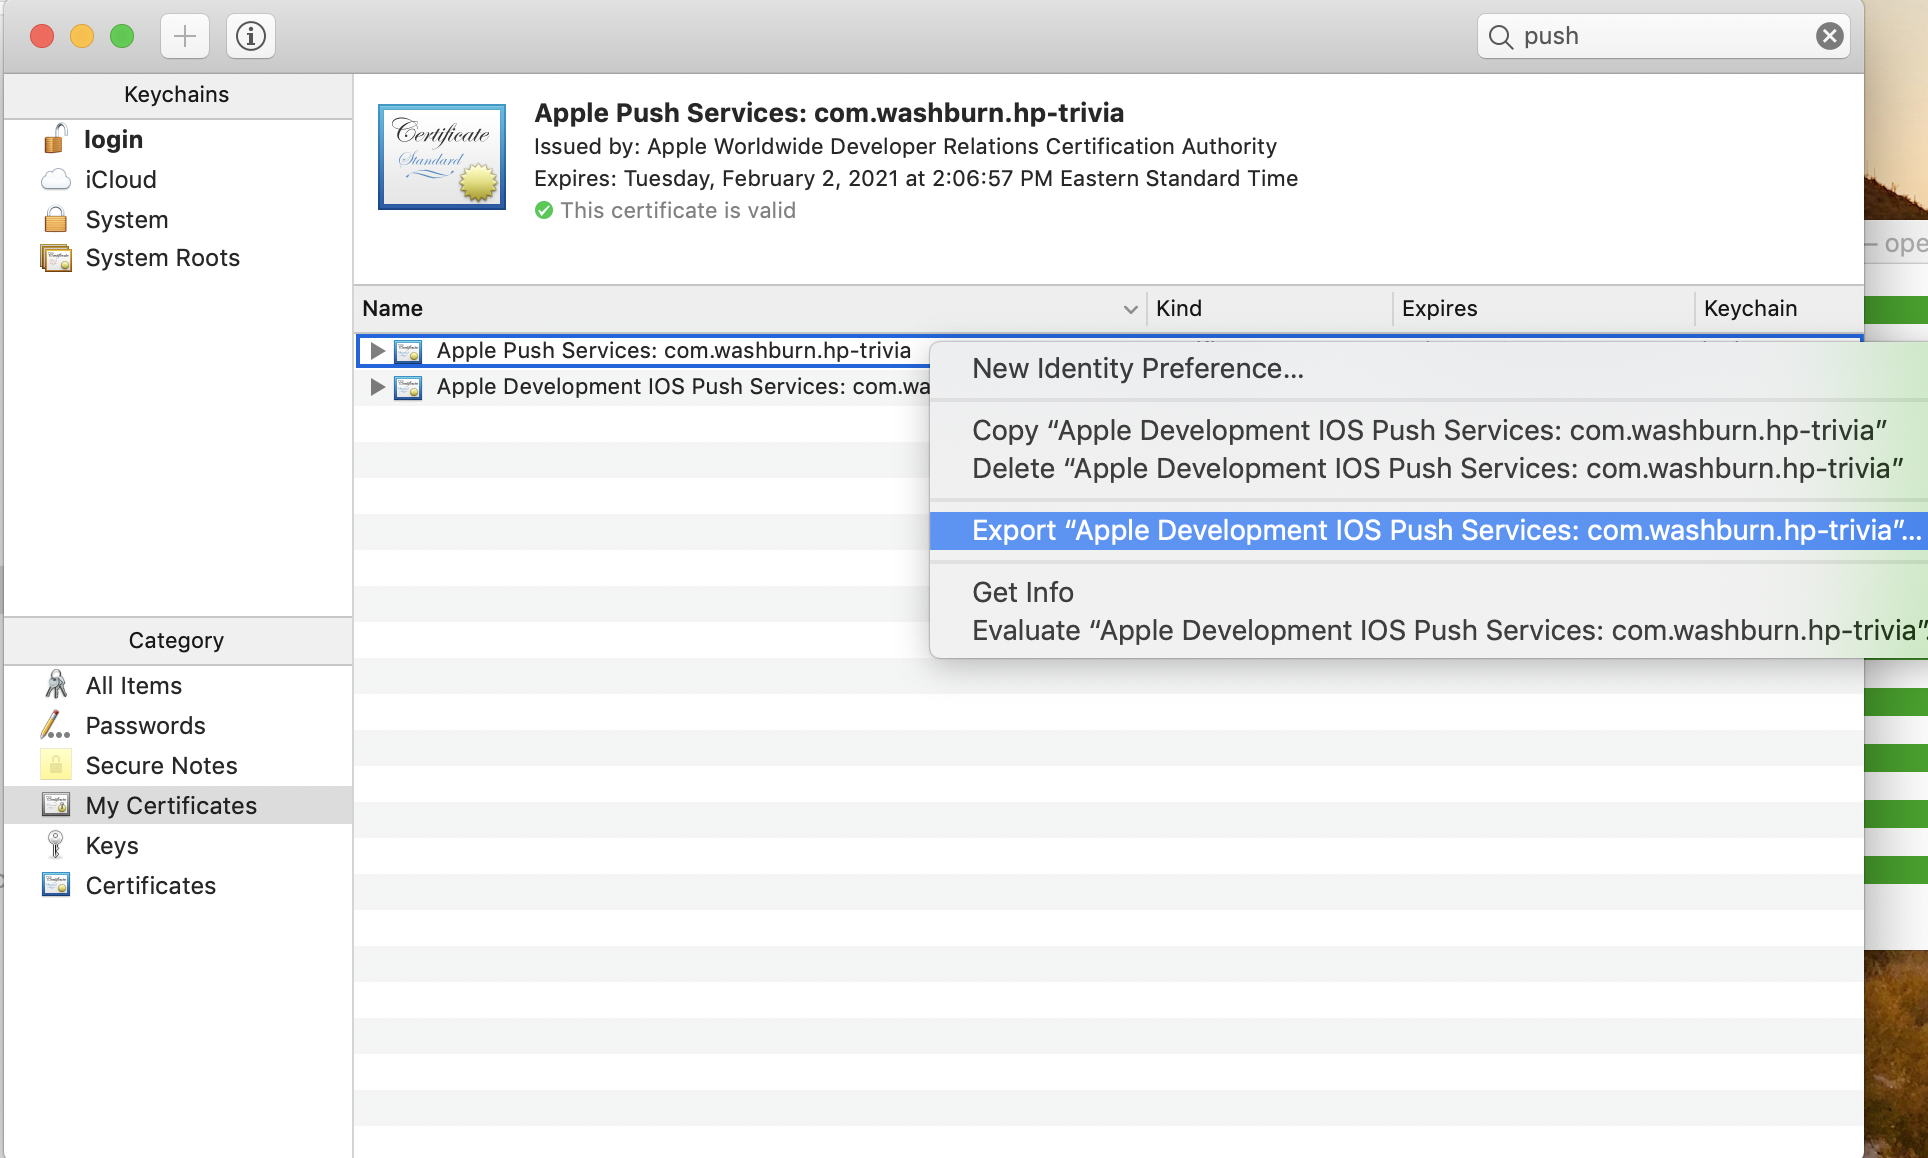
- Save the file as a
.p12. - Run the following command to convert the
.p12into a.pem:openssl pkcs12 -in /path/to/cert.p12 -out /path/to/cert.pem -nodes -clcerts
Send a Push Notification
Now that you have a certificate in the correct format, it’s pretty easy to send a push notification. As an example, I’ll show you how to do this using PyAPNs2. PyAPNs2 is a neat little library based off the original PyAPNs2 but updated to meet the latest and greatest specs for sending push notifications.
Sending a notification should be as easy as this:
from apns2.client import APNsClient
from apns2.payload import Payload

token_hex = 'b5bb9d8014a0f9b1d61e21e796d78dccdf1352f23cd32812f4850b87'
payload = Payload(alert="Hello World!", sound="default", badge=1)
topic = 'com.example.App'
client = APNsClient('key.pem', use_sandbox=False, use_alternative_port=False)
client.send_notification(token_hex, payload, topic)
Which combination of Sandbox and Prod/Dev Certificates should you use?
One thing I found confusing was knowing when to use the sandbox mode and when to use my dev/prod certs. When switching my app builds between Debug/Release/Testflight versions, I got some varying results using different combinations of sandbox/certificates. This is what I was able to find out:
- To send notifications to Xcode builds loaded directly on your device, you should be using sandbox mode with the development certificate. Although sandbox mode with the production certificate also works, I wouldn’t recommend it.
- For sending push notifications to Testflight builds, you should not use sandbox mode and should be using your production certificate.
If you’re curious, these were my actual findings when testing different combinations:
| Sandbox and Dev Cert | Sandbox and Prod Cert | Not Sandbox and Dev Cert | Not Sandbox and Prod Cert | |
| Xcode Debug/Release Builds | Success | Received Successful response but no notification was received | APNS Invalid Token Error | Success |
| Testflight Builds | APNS Invalid Token Error | APNS Invalid Token Error | Received Successful response but no notification was received | Success |
| App Store Release builds | APNS Invalid Token Error | APNS Invalid Token Error | Received Successful response but no notification was received | Success |
This was all a bit of a mess to work through, but at the end of the day I was able to get push notifications working in my app again after migrating onto the Expo bare workflow and deciding to upgrade from the deprecated token-only method of sending push notifications that was so easy to do with Expo’s exponent_server_sdk. Now I have notifications beautifully integrated into my Django API, using Celery to handle the heavy lifting of sending/retrying notifications.
If you have any questions or more takeaways from your experience, comment with them below.